I also added the YMCA logo on the side of the main building, so people can see the name of the building from the side.
I added 2 bins one either side. People are always carrying rubbish, and they may want to sit on the bench and eat.


I have now designed the external building.
I designed this by using basic objects like, box, prisim, planes.
I used boolean to create the see through affect, so you can see into the building. I created the windows from lines and created a plane and gave this a glass material (glass window pane). I used the same material for the door. I first created the door from a box and then added a plane for the glass pane. I created the handles by using the tube object.
As a group we decided to make the objects, characters cartoony and so I decided to keep the materials on the building very plain.
The environment for the animation will be set at night (disco) and so it is important to get the lighting right. I have put in the lighting effects, however we my need to change it, when it comes to animating the characters outside the building. This is one reason why the YMCA logo is bright, we decided to create the look of the logo glowing.


I have created a small animation to show the whole model.
Creating the ear was a challenge. I was difficult to position it in the correct place


In this step a modelled the nose.
This was difficult as the nose wasn’t modelled right in the beginning and so I had to redo the nose. I redid the nose by creating new faces to replace the old ones, this took a long time. Once the nose was right, I then had to shape the outside nostril; again this was difficult as it was very difficult to see which vertex to pull in/out. Once I got the outside shape, I created the actual nostril and extruding it up.
I used the same method above to create the lips.

This step wasn’t a huge problem.
I had to apply a symmetry modifier. I selected the original face. (the face model I have been working with) and then in the modify panel selected Symmetry, this created the symmetry, but the face was squashed into the centre.


 Once creating the mesh I had to edit it, as there were gaps in the mesh. I did this by selecting the object then clicking the editable poly modifier. Within this clicked on vertex and the edit vertices, in this panel I used the option weld. This fixed all of the problems in the mesh.
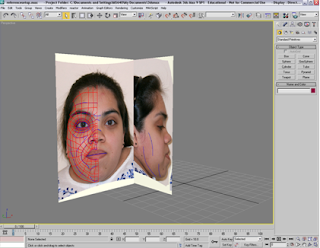
Once the mesh was sorted I had to start the actual modelling process. Before starting this I had to make sure both images were lined up, I had frozen the images before this meant that I couldn’t select the images and move them.
This process included moving all of the lines across as the mesh/surface is flat. I first had to select the first row of lines starting from the right and make this a straight clean line. In the edit poly modifier I used the make planar option; I used the ‘x’ axis. Once I had the straight line, I selected it and using the left viewport I dragged it across to the end of the face.


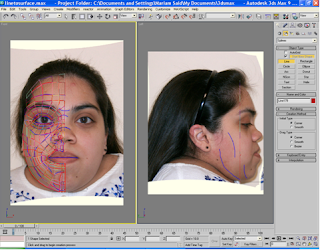
The next step was to break the face up into key areas. Still working in Photoshop, I used a small blue brush to make rough lines of any wrinkles, large creases or protrusion.The blue lines act as guidelines for when breaking the face into key areas, this is known as topology.


